Video
Handbrake for Mac: How to Download, Install, and Compress Video (2026 Guide)

You have a video file that's too large to share. Maybe it's a recording from your camera, a screen capture, or something you downloaded. It's sitting there taking up gigabytes of space and your email or messaging app won't send it.
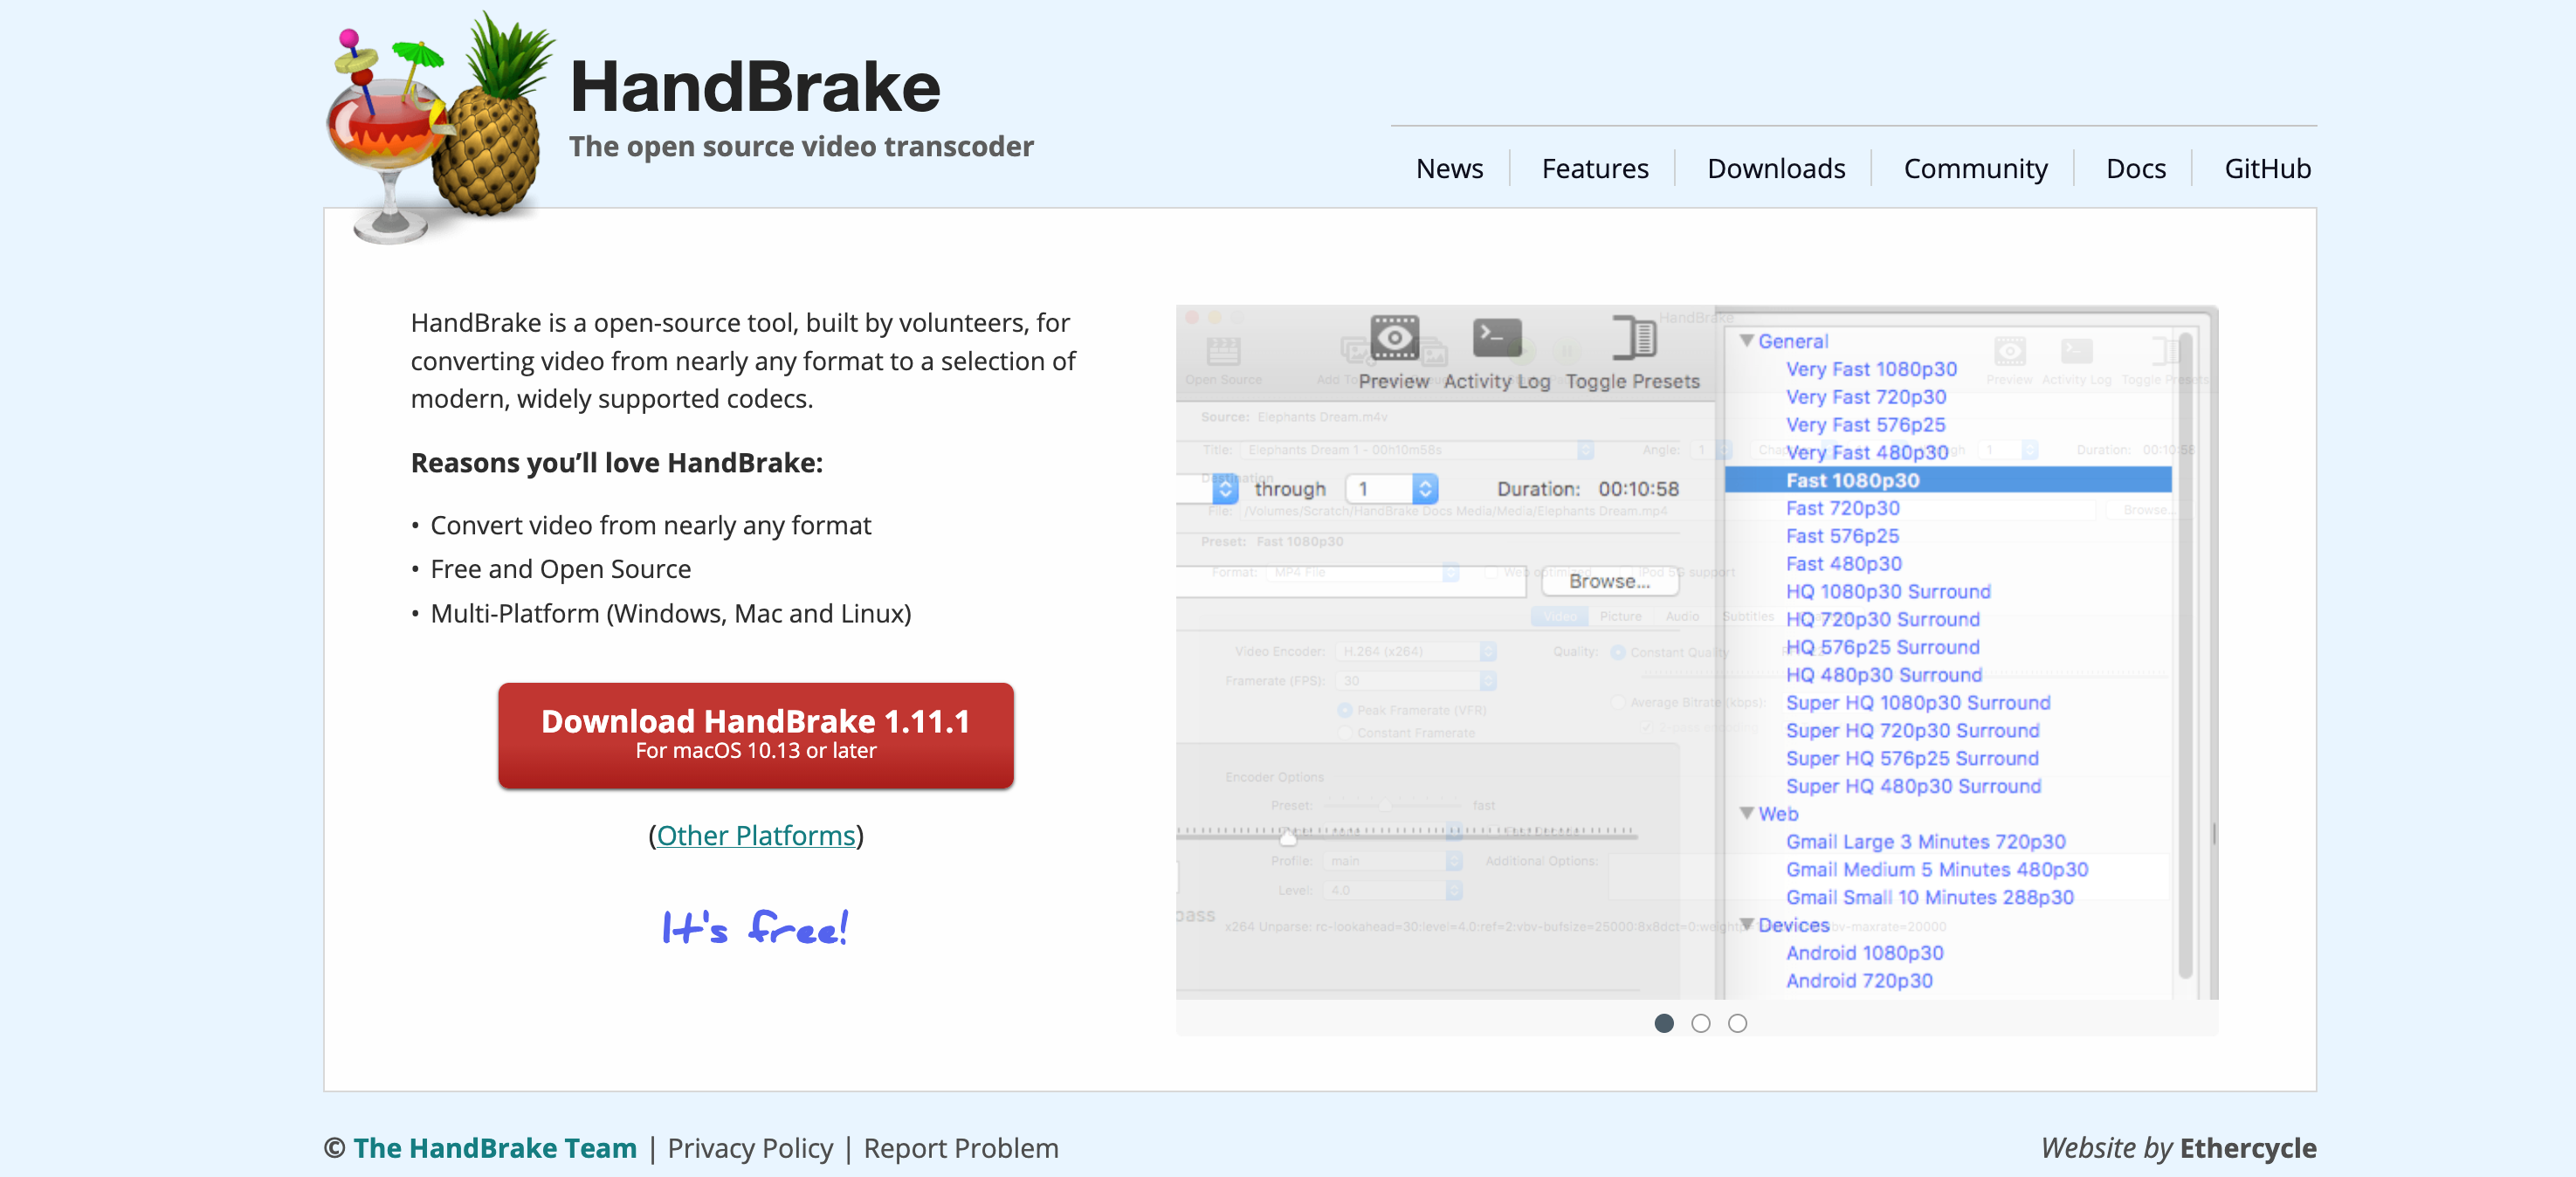
Handbrake fixes that. It's free, open-source, and it's been the go-to video compression tool for Mac users for over 20 years. Version 1.11.1 (check handbrake.fr for latest) works on both Apple Silicon and Intel Macs with a single download.
This guide covers how to download it safely, what the settings actually mean, and how to compress a video without ruining the quality.
Quick answer:
- Current version: 1.11.1
- Mac download: one Universal DMG — works on Apple Silicon and Intel automatically
- Minimum macOS: 10.13 (High Sierra) or later
- Only download from: handbrake.fr or github.com/HandBrake
- Completely free — no account, no paid version, no watermarks
HandBrake as a Video Compressor
Handbrake is a video transcoder. That means it takes a video file and converts it into a different format, usually at a smaller file size. Most people use it to compress large videos — turning a 4GB camera file into something more manageable without making it look terrible.
It's also used to convert between video formats (MOV to MP4 is a very common one), and to rip DVDs that you own into video files you can watch on your devices.
Handbrake has been around since 2003 and is maintained by an open-source community. It runs entirely on your computer — nothing is uploaded to any server, and it doesn't require an account or subscription of any kind.
How to Download Handbrake for Mac Safely
This matters more than it sounds. Handbrake's popularity has made it a target for fake download sites that bundle malware with the installer. The Handbrake team themselves warn about this on their website.
There are only two places to download Handbrake safely:
- handbrake.fr — the official site
- github.com/HandBrake — the official GitHub repository
Do not download from any other site. If you search "Handbrake download" and land somewhere other than these two, close the tab.
How to download: Go to handbrake.fr and click Download. The Mac version is a Universal DMG — one file that works on both Apple Silicon and Intel Macs automatically. You do not need to choose between versions.
How to Install Handbrake on Mac
Step 1: Open the DMG Once the download finishes, open the DMG file from your Downloads folder.
Step 2: Drag to Applications Drag the Handbrake icon into the Applications folder shortcut shown in the DMG window. This copies it to your Mac.
Step 3: Eject the DMG Once the copy is done, eject the DMG. You can delete it from Downloads — you don't need it anymore.
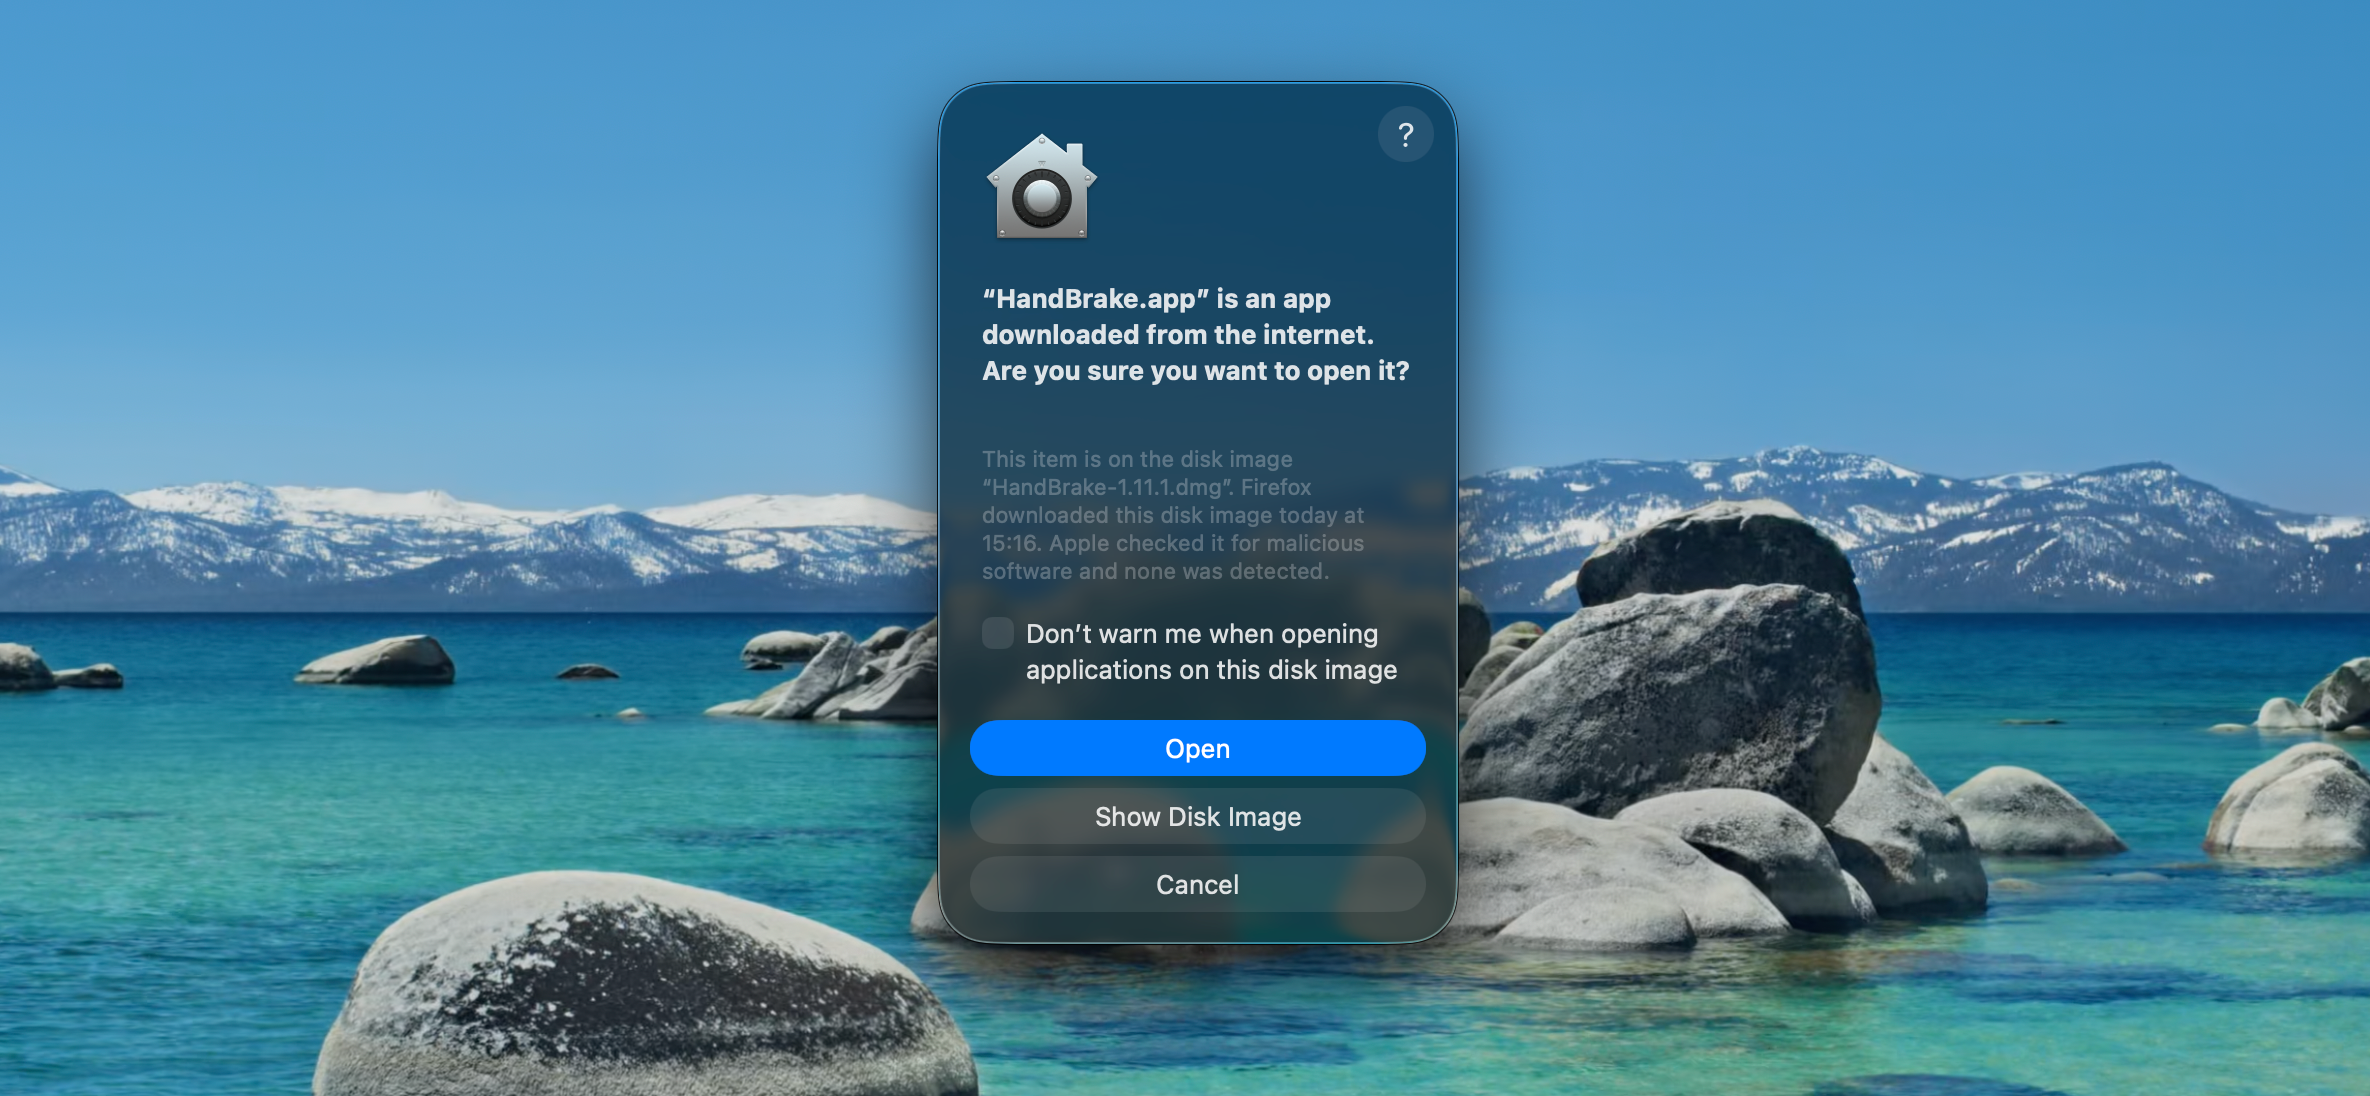
Step 4: First launch — the Gatekeeper prompt The first time you open Handbrake, macOS will show a security warning because it was downloaded from outside the App Store. This is normal and expected for legitimate apps that aren't distributed through Apple's store.
To get past it:
- Open your Applications folder
- Right-click (or Control-click) the Handbrake icon
- Choose Open from the menu
- Click Open again in the confirmation dialog
After this first step, Handbrake opens normally every time. You only need to do it once.
Note for macOS Sequoia & Tahoe: If the right-click method doesn't work, head to System Settings > Privacy & Security and scroll to the bottom, where you'll find an "Open Anyway" button that remains visible for about an hour after your first failed launch attempt
The Handbrake Interface — What You're Looking At
Handbrake's interface looks intimidating at first. There are a lot of tabs and options. But for most tasks, you only need to pay attention to a few things.
Source selection (top left) This is where you load your video file. Click "Open Source" and find the file you want to compress. If you're ripping a DVD, you'd select the disc here instead.
Presets panel (right side) This is the most important thing for beginners. Handbrake comes with a long list of pre-configured settings for different situations. Pick one and most of the other settings are handled for you. More on this below.
Output settings tabs (middle) Six tabs: Summary, Dimensions, Filters, Video, Audio, Subtitles. The Video tab is where you adjust quality settings. The others are for more advanced work.
Save As (bottom) This is where you set the name and location of your output file. Change this before you start — by default it saves to your Desktop.
Start Encode button (top right) When you're ready, click this. The progress bar at the bottom shows how far along the encode is and estimates the time remaining.

How to Compress a Video on Mac with Handbrake
Here's the process step by step for a typical video file.
1. Open your video file Click "Open Source" and select the video you want to compress.
2. Choose a preset In the presets panel on the right, start with "Fast 1080p30" — it's a good balance of speed, file size, and quality for most videos. If your video is 4K, try "Fast 2160p60 4K" instead.
3. Set the output format Under the Summary tab, make sure the Format is set to MP4. This is the most compatible format — it plays on iPhones, Android phones, TVs, and every major platform.
4. Set where to save the file At the bottom, click Browse next to "Save As" and choose where you want the compressed file to go. Give it a name that's different from the original so you don't confuse the two.
5. Click Start Encode Handbrake starts compressing. The time it takes depends on the length of the video, the resolution, and your Mac's chip. Apple Silicon Macs (M1 and later) are significantly faster at this than Intel Macs.
Understanding the RF Quality Setting
The most useful thing to understand in Handbrake is the RF (Rate Factor) slider, found in the Video tab.
For x264 and x265 encoders — the most commonly used options — the scale works like this:
- Lower RF number = higher quality = larger file
- Higher RF number = lower quality = smaller file
The Handbrake documentation recommends RF 20-22 for 1080p video as a good starting point. This produces a file that looks very close to the original while being significantly smaller.
RF 18 gives you near-lossless quality but a large file. RF 28 gives you a very small file but noticeable quality loss on a big screen. For most people, RF 22 is where to start.
A practical example: a 4GB raw video file compressed at RF 22 in 1080p might come out at 400–700MB, depending on the content. Action-heavy scenes with lots of motion take more space than still or slow-moving footage.
Best Handbrake Settings for Common Situations
| Use Case | Preset | Format | RF |
|---|---|---|---|
| Sharing via iMessage or WhatsApp | Fast 480p30 | MP4 | 28 |
| Uploading to YouTube | Fast 1080p30 | MP4 | 22 |
| Archiving home videos | HQ 1080p30 Surround | MKV | 20 |
| Apple devices (iPhone, iPad, Apple TV) | Apple 1080p60 Surround | MP4 | 22 |
| Ripping a DVD | Fast DVD | MP4 | 22 |
| Reducing a 4K file | Fast 2160p60 4K | MP4 | 22 |
Converting MOV to MP4: This is one of the most common Handbrake tasks on Mac. Camera footage and screen recordings often come out as MOV files, which are large and don't play well on non-Apple devices. Load the MOV file, choose the Fast 1080p30 preset, set the format to MP4, and encode. The result plays everywhere.
How to Rip a DVD with Handbrake on Mac
Modern Macs don't have built-in DVD drives, so you'll need an external USB DVD drive first.
Step 1: Insert the disc and connect the drive to your Mac.
Step 2: In Handbrake, click "Open Source" and select the disc (it will show up as a drive in the file picker).
Step 3: Handbrake will scan the disc and show a list of titles. The main feature is usually the longest title in the list. Select it from the Title dropdown.
Step 4: Choose a preset. "Fast DVD" works well for most DVDs. Set the format to MP4.
Step 5: Set your save location and click Start Encode.
One important note: Handbrake can only rip DVDs that are not copy-protected. Most commercially sold movies have copy protection built in, and Handbrake alone cannot bypass this. It works well for home videos, personal recordings, and unprotected discs.
Where Handbrake Has Limits
Handbrake is excellent at what it does, but it's worth knowing what it can't do.
It's not a video editor. It’s not a full video editor. You can do basic trimming, but not cut scenes, add text, or combine clips. If you need to edit before compressing, use iMovie or another editor first, then run the result through Handbrake.
Output formats are limited. Handbrake outputs MP4, MKV and WebM. If you specifically need a MOV, AVI, or WMV file, Handbrake won't produce that directly.
Copy-protected commercial DVDs can't be ripped with Handbrake on its own. This is primarily a technical limitation of HandBrake. Bypassing DVD copy protection may be restricted or illegal depending on your country’s laws
The interface isn't particularly Mac-native. It works fine, but it doesn't look or feel like a Mac app designed from the ground up for macOS. If that matters to you, there are paid alternatives that wrap similar technology in a polished Mac interface.
FAQ
Is Handbrake really free? Yes, completely. Handbrake is licensed under the GPL. There is no paid version, no premium features, and no watermarks on your output files. The developers accept donations but it's entirely optional.
Is Handbrake safe to download? Yes — from handbrake.fr or github.com/HandBrake. From anywhere else, be cautious. There are fake versions of Handbrake that contain malware. The Handbrake team explicitly warns about this on their website.
Does Handbrake work on Apple Silicon Macs? Yes. The Mac download is a Universal binary, meaning the same DMG file runs natively on both Apple Silicon (M1, M2, M3, M4) and Intel Macs. Apple Silicon Macs encode significantly faster.
Will compressing a video reduce quality? Yes, some quality is always lost during compression. The RF setting controls how much. At RF 20-22, most people can't spot the difference on a regular screen. The original file is never modified — Handbrake always creates a new file.
How long does encoding take? It depends on the length of the video, the resolution, the preset, and your Mac. A 10-minute 1080p video on an M2 MacBook Air might take around 3-5 minutes. The same file on an older Intel Mac might take 15-25 minutes. The progress bar shows an estimated time remaining once encoding starts.
Can Handbrake convert MOV to MP4? Yes, and this is one of the most common things people use it for on Mac. Load the MOV file, pick a preset, set the format to MP4, and encode.
The Bottom Line
Handbrake is the best free video compressor for Mac. The learning curve is steeper than most Mac apps, but once you understand the RF slider and presets, you can compress almost any video in a few clicks.
Download it from handbrake.fr, start with the "Fast 1080p30" preset, leave the RF at 22, and see how the result looks. Most of the time, that's all you need.
Leave a Comment